
Configuring accurate WooCommerce delivery options for each shipping method — including express delivery — starts here. This is one of the most common questions from store owners who offer more than one shipping option: free standard shipping, express, local pickup, and so on.
Each one has a different transit time. Showing the same delivery estimate for all of them is misleading.
The short answer: yes, it’s possible – but how you do it depends on the tool you’re using. There are two routes. You can map each shipping method to its own delivery window in a short functions.php snippet, which costs nothing and gives you complete control. Or you can use a plugin and skip the maintenance. This guide covers both — the code method first, because you should know what you are replacing before you install anything.
This is the complete rundown: every delivery option WooCommerce and its plugins give you, how a delivery estimate is actually calculated, and the exact settings for methods, zones, per-product times, order cutoffs, and non-delivery days — with both the code and the plugin path.
What delivery options can you offer in a WooCommerce store?
“Delivery options” covers two separable things, and conflating them causes most of the confusion around this topic. The first is the set of shipping methods a customer can choose at checkout. The second is the delivery timing information you display for each of those methods. WooCommerce gives you the first out of the box and none of the second — a shipping method tells the customer what they are paying, never when the parcel arrives. Everything below is a method; the estimate attached to it is something you add.
- Flat rate with a delivery window. The workhorse: a fixed charge with a standard transit time attached, typically 3-5 business days. Most stores start and end here.
- Free shipping with a longer window. Free shipping is usually the cheapest, slowest service you buy, so give it a longer estimate than paid standard — 5-7 business days against 3-5. If free and paid standard show the same date, you have removed the reason to pay.
- Express or priority. In WooCommerce this is simply a second flat rate instance with a higher cost. It needs a visibly shorter window — 1-2 business days — or the upgrade has nothing to sell.
- Local pickup. No delivery date applies, because nothing is in transit. Frame it as readiness instead: “Ready for collection in 24 hours.”
- Local delivery. Your own driver inside a defined radius, usually a same-day or next-day promise. Because you control the vehicle, this is the one estimate you can state with confidence.
- Customer-selected date or time slot. Not a core WooCommerce feature — it needs a date-picker plugin. It also inverts the relationship: instead of you estimating, the customer commits you to a date you then have to hit.
The first five are configured under WooCommerce → Settings → Shipping, one zone at a time, and each is independent of the others. The timing text that sits beside them is what the rest of this guide covers.
How a Delivery Estimate Is Actually Calculated
Before configuring anything, it helps to know what actually goes into the number you’re about to display. An accurate delivery estimate is built from four inputs, not one:
- Processing time — how long it takes you to pack and hand the order to a carrier, starting from the moment it’s placed.
- Order cutoff time — the point in the day after which an order rolls over to the next business day’s processing, rather than counting as placed “today.”
- Carrier transit time — how long the shipping method itself takes once the parcel is actually collected.
- Non-delivery days — weekends and holidays your store or carrier doesn’t move parcels on, excluded from the count rather than silently absorbed into it.
Leave any one of these out and the estimate drifts optimistic. The most common mistake is counting only carrier transit time and ignoring processing time entirely — that’s how a “3-5 day” promise quietly turns into a 6-7 day reality once packing time and a missed cutoff are factored in. The next two sections cover the two inputs stores most often get wrong: the cutoff time and non-delivery days. For the full mechanics of how these combine into a single date, see our guide to what an estimated delivery date actually means.
Why Different Shipping Methods Need Different Estimates
When a customer chooses express shipping, they’re paying for speed. If your store shows the same ‘Get it in 5–7 days’ estimate for both standard and express options, one of two things happens.
Either the customer wonders why they’re paying more for express, or they feel misled when express doesn’t arrive noticeably faster than your estimate promised.
Accurate per-method estimates help customers make an informed choice. They also reduce post-purchase complaints from customers who expected faster delivery and didn’t get it.
Setting different delivery times per shipping method in code
This is the no-plugin route. Add the following to your child theme’s functions.php (never the parent theme — a theme update will wipe it) or to a code snippets plugin. It keeps a simple map of shipping method to delivery window and prints the matching window next to each method label at cart and checkout.
<?php
/**
 * Map each shipping method to its own delivery window and show it
 * next to the method label at cart and checkout.
 */
add_filter( 'woocommerce_cart_shipping_method_full_label', 'qsd_method_eta', 10, 2 );

function qsd_method_eta( $label, $method ) {

	$windows = array(
		'flat_rate'        => '3-5 business days',
		'free_shipping'    => '5-7 business days',
		'local_pickup'     => 'Ready in 24 hours',
		'flat_rate:2'      => '1-2 business days', // A specific instance ID.
	);

	// Instance-specific match wins over the general method match.
	$key = isset( $windows[ $method->get_id() ] )
		? $method->get_id()
		: $method->get_method_id();

	if ( empty( $windows[ $key ] ) ) {
		return $label;
	}

	return $label . sprintf(
		'<small class="qsd-method-eta">%s</small>',
		esc_html( $windows[ $key ] )
	);
}
A few things worth understanding about this snippet:
get_method_id()andget_id()are not the same thing.get_method_id()returns the method type —flat_rate,free_shipping,local_pickup.get_id()returns the specific instance, likeflat_rate:2. That distinction is the whole key to per-zone control: the type is shared, the instance is not.- You find instance IDs in WooCommerce → Settings → Shipping. Open a zone, hover over a shipping method’s name, and read the number at the end of the edit link in your browser’s status bar — that is the instance ID. Combine it with the method type and you have the key to use in the array, such as
flat_rate:2. - The same Flat rate method in two zones has two different instance IDs. Add Flat rate to your domestic zone and Flat rate again to your international zone and WooCommerce creates two independent instances. That is exactly how you give Zone A a 1-2 day window and Zone B a 10-day window — same method type, two array keys.
- The lookup order matters. The snippet checks the instance ID first and only falls back to the method type. So
flat_rateacts as your catch-all default for every flat rate instance you have not listed explicitly, and any instance you do list overrides it.
One caveat worth checking on your own store: woocommerce_cart_shipping_method_full_label is a classic-template filter. The Cart and Checkout blocks build their shipping options through the Store API rather than through this label filter, so verify the output on a block-based checkout rather than assuming it carries over.
What about different delivery times per shipping zone?
This is the most common follow-up question, and the answer is already sitting in the snippet above — it just is not obvious until you understand how WooCommerce structures zones.
Shipping zones are not a layer sitting on top of shipping methods. They contain them. When you add Flat rate to your Domestic zone and then add Flat rate again to your International zone, you have not created one method used in two places. You have created two separate method instances, each with its own settings, its own cost, and its own instance ID. That is why instance IDs are inherently zone-specific.
So the domestic Flat rate might be flat_rate:3 while the international one is flat_rate:7. Both return flat_rate from get_method_id(), which is why a map keyed on the method type alone can never tell them apart. Keyed on the instance ID, they are simply two different rows in the $windows array.
To show a 2-day window for a domestic zone and a 10-day window for an international one using the same Flat rate method, you do not need a second plugin or a duplicate shipping method. You look up both instance IDs under WooCommerce → Settings → Shipping, add both as keys, and give each its own window. WooCommerce only offers a customer the rates belonging to the zone their address falls into, so each shopper sees exactly one estimate — the one that matches where the parcel is actually going.
The Per-Product Override Approach
Sometimes the variation isn’t about shipping method at all — it’s about product type. Handmade items take longer to dispatch than stock items, for example. In that case, the cleanest solution is per-product delivery day overrides.
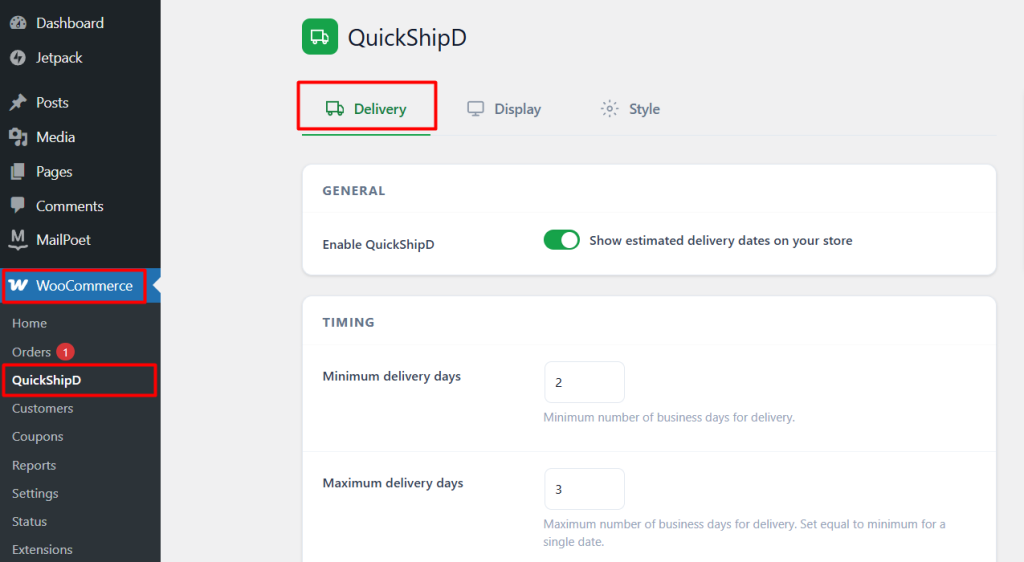
QuickShipD handles this at the product level. Inside any WooCommerce product, under the Shipping tab, there’s a QuickShipD section where you can set a minimum and maximum delivery days override specific to that product. This overrides the global settings for that product only. So a made-to-order item can show 7–10 days while a stock item shows 3–5, all from the same plugin configuration.
Setting Global Defaults That Reflect Your Primary Method
For most small WooCommerce stores with one main shipping method, the best approach is to configure your global delivery days to match your standard shipping transit time, then use per-product overrides for anything that deviates.
In QuickShipD’s Delivery tab, set your Minimum and Maximum delivery days to match your standard carrier’s typical transit window.
Setting Your Order Cutoff Time
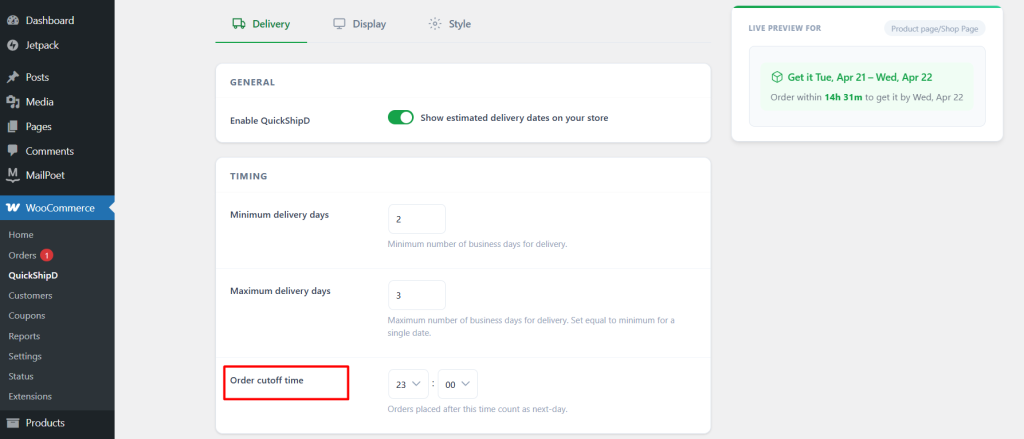
The cutoff time decides which day an order counts as “day zero” for processing. An order placed at 9am and one placed at 9pm the same day don’t deserve the same estimate if your warehouse stops packing at 4pm — the second one hasn’t actually started processing until the next business day, whatever the calendar date says.
Set this to match when your team actually stops fulfilling orders for the day, not an aspirational time. Add your cutoff in QuickShipD’s Delivery tab: any order placed after it automatically rolls into the next business day’s processing window, so the displayed estimate stays accurate without you touching it per order.
Excluding Weekends and Holidays
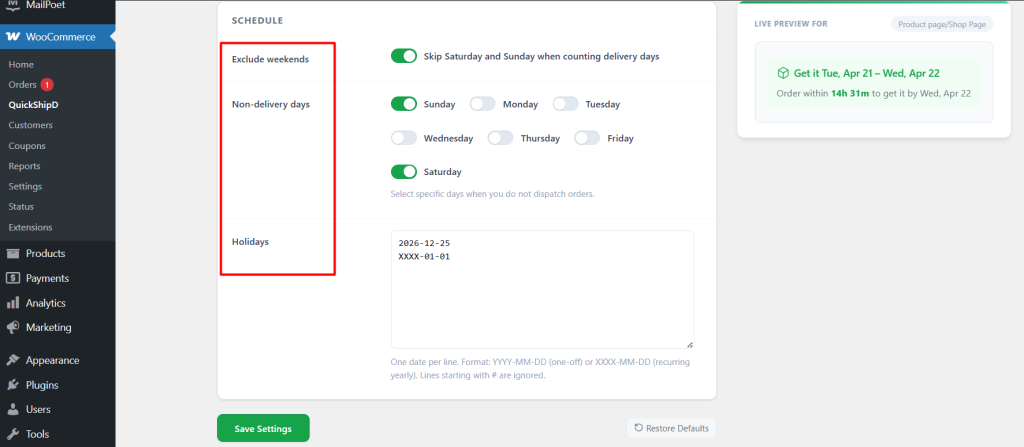
A “3-5 business day” estimate that silently counts Saturday and Sunday as transit days isn’t a 3-5 day estimate at all — it’s shorter than what you’ll actually deliver, every single week. The same applies to public holidays: a delivery window that spans a holiday your carrier doesn’t run on will land late unless the holiday is excluded from the count in advance.
Toggle on “Exclude weekends” in the Delivery tab if you don’t ship on Saturdays and Sundays, and add known public holidays to the Holidays field ahead of time — ideally at the start of each quarter, not the week before. Once a holiday is listed, QuickShipD skips it automatically in every estimate that would otherwise span it, every year it recurs.
What If You Genuinely Need Method-Specific Estimates?
If you want to show different delivery windows based on which shipping method the customer selects at checkout — Standard showing 5–7 days, Express showing 1–2 days — the snippet above is the simplest way to do it. It’s yours to maintain, though.
If you’d rather not carry that maintenance, look for a plugin that hooks into WooCommerce shipping zones and rates directly and handles per-shipping-method delivery estimates for you. Your shipping carrier’s own rate calculator is another option — it often includes transit time data too.
| PRO TIP If you offer express shipping, consider setting your product-level override to match your express transit time and displaying that as the estimate when express is selected. Even if the plugin doesn’t switch estimates dynamically based on method selection, showing the fastest possible delivery option upfront — and noting standard takes longer — is often enough to set accurate expectations. |
For most stores, the combination of global defaults and per-product overrides covers 90% of use cases without needing complex per-method logic.
Shipping Times & Express Delivery Options, Explained
Standard, express, and local pickup are not just price tiers — they’re different delivery options with different transit windows. If you offer an express shipping option, it should show a visibly shorter, separately calculated estimate rather than reusing your standard delivery window. Customers comparing shipping options at checkout use that time difference to decide whether the express upgrade is worth paying for.
Frequently asked questions
How do I find a shipping method’s instance ID?
Go to WooCommerce → Settings → Shipping and open the zone the method belongs to. Hover over the method name and look at the edit link — it ends in a number, and that number is the instance ID. A Flat rate with instance ID 2 is referenced in code as flat_rate:2.
Can I give the same shipping method a different delivery time in each zone?
Yes. Because each zone holds its own instance of the method, the same Flat rate added to two zones produces two different instance IDs. Key your delivery windows on the instance ID rather than the method type and each zone gets its own estimate — a short domestic window and a long international one, from one method type.
What happens to methods I have not listed in the array?
Nothing. The snippet returns the original label untouched when there is no match, so an unlisted method simply displays as WooCommerce normally renders it. Listing a bare method type such as flat_rate gives you a catch-all default for every flat rate instance you have not named explicitly.
Should I use per-product overrides or per-method windows?
It depends on where the delay actually comes from. If the variation is in how long you take to dispatch — made-to-order versus stock — use per-product overrides. If the variation is in how long the carrier takes — express versus standard, domestic versus international — use per-method or per-instance windows. Many stores end up using both.
Can I offer shipping and local pickup with different delivery dates?
Yes, and the mechanism is exactly the same one used for everything else. Local pickup is a shipping method like any other: you add it to a zone, WooCommerce gives it its own instance ID such as local_pickup:5, and it takes its own entry in the $windows array alongside flat rate and free shipping. Nothing special is required to give it a different window.
What should change is the wording. A pickup is not a delivery: nothing is in transit, and no carrier is involved. A delivery date is the wrong frame, and it invites the wrong question at the counter.
“Ready for collection in 24 hours” tells the customer the only thing that matters to them: when the order will be waiting.
If you run two collection points, add local pickup twice — once per zone or once per location. Each instance gets its own readiness window and its own wording.
Can I set a different delivery time per product rather than per method?
Yes, and it answers a different question from a per-method window. A per-product delivery time is a lead time: a custom field on the product, stored in post meta and edited under the product’s Shipping tab, holding the number of days it takes you to get that item out of the door. A made-to-order item gets 7, a stock item gets 0. It describes your workshop, not the carrier.
The two do not compete — they compose. The total estimate is product lead time + method transit time. A made-to-order item with a 7-day lead time on a 2-day express method is a 9-day estimate; the same item on a 5-day free shipping method is 12. That is also why per-product alone is not enough once you offer express: the lead time is identical whichever method the customer picks, so only the transit half changes. When a cart holds several items, take the highest lead time in the cart rather than the sum — the order ships once, when the slowest item is ready.
Why do my delivery times not update when the customer changes shipping method?
There are two causes and they need different fixes. The first is that the estimate was rendered once and never re-rendered.
Selecting a different shipping method in the classic cart or checkout triggers an AJAX refresh of the shipping and totals area only. Anything printed inside the method label gets recalculated automatically. Anything printed elsewhere on the page — a standalone notice above the order review, say — keeps whatever value it was given on page load.
Either print the estimate inside the method label, as the snippet above does, or re-render your block on the updated_checkout and updated_shipping_method events.
The second cause is architectural. woocommerce_cart_shipping_method_full_label is a classic-template filter and it does not fire in the Cart and Checkout blocks at all. The blocks request shipping rates through the Store API and render them in JavaScript, so a PHP label filter never runs — no error, no output, nothing to debug. If your estimate appears on a classic checkout and silently vanishes on a block-based one, this is the reason. The fix is not a different filter but a different mechanism: expose the window as rate metadata through the Store API and render it with a block integration.