
If you’re charging one flat shipping rate for every customer regardless of where they live, you’re either overcharging your nearby customers or losing money on your far-away ones.
Shipping zones fix this, but the settings screen can look more intimidating than it actually is the first time you open it.
Here’s a plain walkthrough of what shipping zones are, how to set them up, the ordering rule that silently breaks most stores’ rates, and where accurate delivery estimates fit once your zones are in place.
What a Shipping Zone Actually Is
A shipping zone is a geographic region — a country, a state, a group of postal codes — with its own set of shipping methods and rates.
Instead of one rate for your entire customer base, you can charge less for local orders and more for orders that genuinely cost more to fulfil.
WooCommerce checks a customer’s shipping address against your configured zones in order, and uses the first matching zone’s methods and rates. Getting the order of your zones right matters as much as the zones themselves.
| 🪧 IMPORTANT WooCommerce matches zones top to bottom and stops at the first match. Always place your most specific zones (a single city or postal code range) above broader ones (an entire country), or the broad zone will catch orders meant for the specific one. |
Setting Up Your First Shipping Zone
Go to WooCommerce → Settings → Shipping → Add Zone. Give the zone a name you’ll recognize later — “Local Metro Area” is more useful six months from now than “Zone 1.”
Then select the regions this zone covers: countries, states, or specific postal codes.
Once the region is set, add your shipping methods for that zone — flat rate, free shipping, local pickup, or a carrier-calculated rate if you’re using a shipping extension.
Each zone can have completely different methods from every other zone.
- Local zone: often supports local pickup and a cheap flat rate, since transit distance is short
- Domestic zone: typically a standard flat rate or carrier-calculated rate covering your home country
- International zone: usually needs its own rate structure and, often, a longer delivery window
| 💡 PRO TIP Always keep a catch-all “Rest of the World” or “Everywhere Else” zone at the very bottom of your list. Without one, customers outside your defined zones simply won’t see any shipping option — and won’t be able to check out at all. |
The First-Match Rule: Why Zone Order Decides Everything
This is the single most misunderstood part of WooCommerce shipping zones, and the cause of most “my rates are wrong” support tickets.
WooCommerce reads your zone list from top to bottom. It stops at the first zone whose region contains the customer’s address, uses that zone’s methods, and ignores every zone below it.
It does not merge matching zones. It does not pick the most specific one. Position on the screen is the only thing that decides.
So a country-wide zone sitting above a city zone will shadow it completely. Every city address matches the country zone first, and the city rates never appear for anyone.
- Most specific at the top. Postal codes, then cities, then states.
- Broader zones below. Countries and multi-country regions.
- Catch-all at the bottom. “Locations not covered by your other zones” is always evaluated last regardless of position, so it can never shadow a zone you defined.
To reorder, drag the handle at the left of each row on the WooCommerce → Settings → Shipping screen, then save.
Common Shipping Zone Mistakes
Almost every broken shipping setup traces back to one of these five.
- No catch-all zone. Any address outside your defined zones gets no shipping option and cannot check out.
- Broad zone above a narrow one. The narrow zone’s rates become unreachable, as above.
- A matched zone with no methods in it. WooCommerce matches the zone, finds nothing to offer, and shows nothing.
- Methods added but toggled off. Easy to miss, since the method still appears in the zone’s list.
- Testing in the admin preview. Always test with a real customer address in the cart shipping calculator instead.
Where Delivery Estimates Fit Once Zones Are Set Up
Shipping zones solve the rate side of the equation, but they don’t tell your customer when an order will actually arrive — that’s a separate piece WooCommerce doesn’t handle natively.
If your international zone genuinely takes longer than your domestic one, your delivery estimate should reflect that difference.
This is where a plugin like QuickShipD comes in: it calculates and displays a delivery window based on your delivery days, cutoff time, and non-delivery days, giving customers the timing information your shipping zones alone don’t provide.
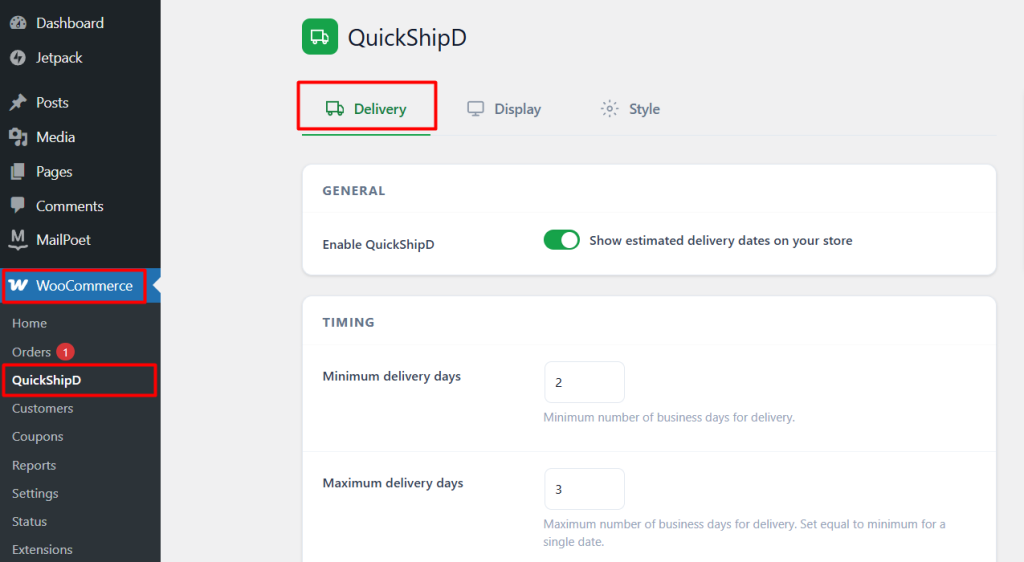
One honest limitation: QuickShipD’s delivery day settings are store-wide or per-product, not zone-specific out of the box.
If your zones have meaningfully different transit times, use per-product overrides for products that ship primarily to a slower zone, rather than expecting the estimate to automatically detect the customer’s location.
Zones Handle Cost, Estimates Handle Timing
Shipping zones get your rates right for each region you serve. Delivery estimates handle the other half of the equation — telling customers when to expect their order once the rate question is settled.
Once your zones are configured, QuickShipD adds that timing layer with a five-minute setup of its own.
Frequently asked questions
Which shipping zone applies if a customer’s address matches more than one?
WooCommerce evaluates your zones top to bottom, in the exact order they appear on the WooCommerce → Settings → Shipping screen, and uses the first zone whose region matches the customer’s address. It then stops.
It does not merge the matching zones together, and it does not pick the most specific match. Position on that screen is the only thing that decides.
That means a broad zone placed above a narrow one shadows it entirely. The classic symptom is a country-wide zone sitting above a city zone: every city address matches the country zone first, so the city rates never appear for anyone.
The fix is to drag the more specific zones above the broader ones using the handle at the left of each row, then save.
One exception worth knowing: “Locations not covered by your other zones” is always evaluated last regardless of where it appears, so it can never shadow a zone you have defined.
Why are my shipping rates not showing at checkout?
It is almost always one of five things, in rough order of how often they come up.
The address falls outside every zone you have defined and you have no “Locations not covered by your other zones” fallback, so WooCommerce has nothing to offer. Or a broader zone above a narrower one is matching first, and that zone has no methods in it.
Or the method exists in the matched zone but its toggle is switched off. Or the product is marked Virtual, which removes shipping from the order entirely.
Or Free shipping is set to require a minimum order amount or a coupon that this cart has not met.
Diagnose it by entering a real customer address into the cart shipping calculator rather than trusting the admin preview, and check which zone actually matched rather than the one you expected to match.
Can one shipping method appear in more than one zone?
Yes. The same method type — Flat rate, Free shipping, Local pickup — can be added to as many zones as you like, and each addition creates an independent instance with its own settings, its own cost and its own instance ID.
Flat rate in your domestic zone and Flat rate in your international zone are two separate things that happen to share a name. Changing the cost of one has no effect on the other.
That instance ID, visible as the number at the end of the method’s edit link, is what lets you target a single zone’s method in code — for example to give each zone its own delivery window.
What you cannot do is share one configured method across several zones. There is no such concept in WooCommerce.
What is the difference between shipping zones and shipping classes?
Zones are about where the order is going. Classes are about what is in it.
A shipping class groups products that cost the same to ship — bulky items, fragile items, lightweight accessories — and lets a flat rate charge differently for each group.
The two work together: the zone decides which rate table applies, and the class decides which line in that table the product uses.
Can I create a shipping zone by postcode or ZIP code?
Yes. When you add a region to a zone, choose the country or state first, then use the postcode field that appears to narrow it further.
You can enter individual codes, one per line, wildcards such as SW1*, or numeric ranges like 90210...90220.
Because a postcode zone is highly specific, it needs to sit above your country zone to be reachable at all.
How many shipping zones should a small store have?
Most small stores do fine with two or three: a domestic zone, an international zone, and sometimes a local zone for nearby pickup or reduced rates.
Add more only when a specific region genuinely needs different pricing.
Can one product belong to multiple shipping zones?
Zones apply based on the customer’s shipping address, not the product.
Every product can potentially ship to every zone unless you’ve specifically restricted it.
What happens if a customer’s address doesn’t match any zone?
They won’t see a shipping method and won’t be able to complete checkout.
This is exactly why a catch-all zone at the bottom of your list matters.