
Do you want to show estimated delivery dates not just on product pages, but all the way through your WooCommerce cart and checkout?
Most plugins stop at the product page, leaving a trust gap right at the moment customers are about to pay.
In this tutorial, I’ll show you how to display delivery estimates at every step of the funnel using QuickShipD.
You’ll need WordPress 6.0+, WooCommerce, and the free QuickShipD plugin.
What You’ll Need
QuickShipD plugin (free — no account required)
- WordPress 6.0 or higher
- WooCommerce with cart and checkout pages set up
Step 1: Install QuickShipD
Go to Plugins » Add New in your WordPress dashboard. Search for “QuickShipD” and click Install Now, then Activate. You’ll find the plugin settings under WooCommerce » QuickShipD.
If you’ve already installed QuickShipD and configured your delivery timing, skip to Step 2.
Step 2: Enable Cart Page Display
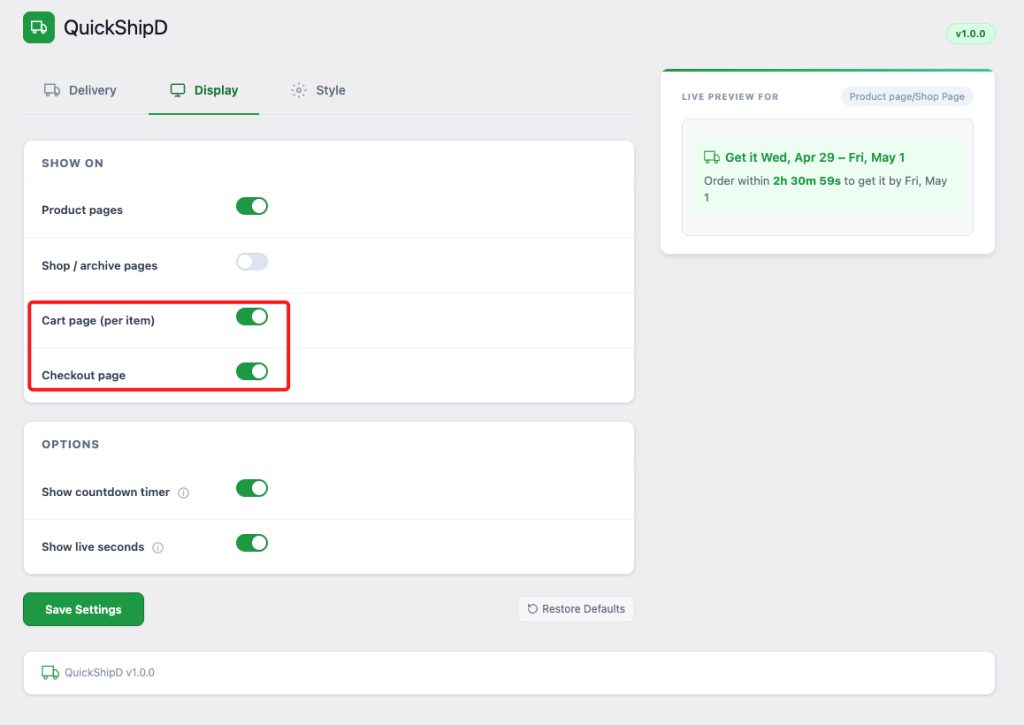
Open QuickShipD settings and click the Display tab. You’ll see a list of pages where the delivery estimate widget can appear.
Toggle Cart page (per item) to on. This adds a delivery estimate below each line item in the cart – so if a customer has three products, each one shows its own delivery window.
This is especially useful for stores with mixed inventory, a handmade item and a ready-to-ship item will each show different delivery dates based on their individual settings.
Step 3: Enable Checkout Page Display
In the same Display tab, toggle Checkout page to on. QuickShipD is fully compatible with WooCommerce’s block-based checkout, so this works out of the box with modern themes and page builders.
The delivery estimate appears in the order summary section at checkout — exactly where customers look for final reassurance before clicking Place Order.
Step 4: Verify the Full-Funnel Experience
Click Save Settings, then walk through the purchase flow yourself as a test customer. Add a product to your cart, visit the cart page, and proceed to checkout.
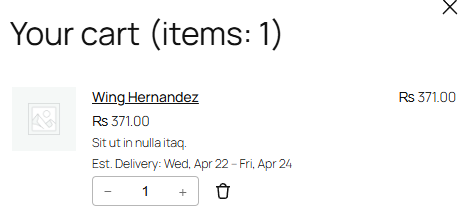
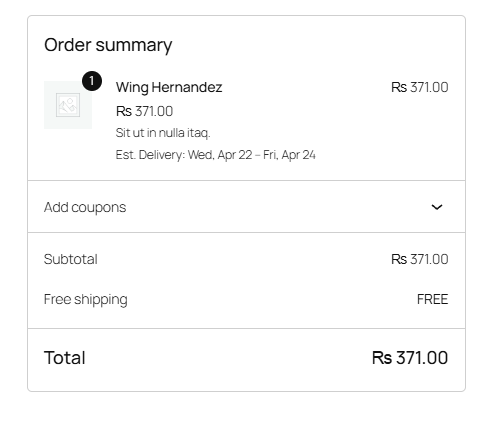
You should see the delivery estimate widget appearing at each step. If something doesn’t look right, check the Style tab to adjust colors or spacing so the widget fits your theme.
Conclusion
Now you know how to display delivery dates on WooCommerce cart and checkout pages. The setup is just two toggles in the Display tab — and the impact on customer confidence is significant.
QuickShipD makes it easy to maintain delivery trust across every step of the purchase funnel, not just the product page.
If this guide helped, please follow us on social media for more WooCommerce tutorials. You might also like:
- How to Show Estimated Delivery Dates on WooCommerce Product Pages
- How to Add an Order Cutoff Time Countdown to Your WooCommerce Store
- QuickShipD vs YITH WooCommerce Delivery Date: Which Is Better?